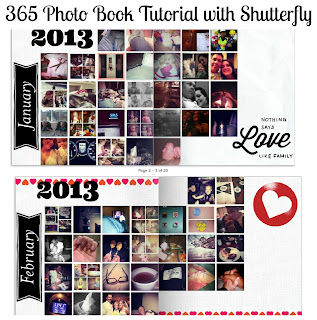
 Todays post is a little different because this is not a finished project and it wont be until next year! Why am I sharing a project with you that isn't anywhere near being finished?
Well, because its best to work on this project a little bit, once a month instead of doing it all at once. So you can start yours today!
If you follow me on instagram you'll see that once a day I post a photo with #365ofus. This is my way of documenting our year one day at a time. My plan all along has been to create a family yearbook for each year.
When I sat down to create this photo book, I discovered that my two favorite photo services online [snapfish & shutterfly] did not have a preset template. So I created one and I'm sharing how I did it with you.
This is a 365 Days of Us Photo Book Tutorial using Shutterfly
Start by logging in to Shutterfly [or create a new login its free]
 |
| My Shutterfly Home Page |
Once you've logged in click on Photo Books under Start a new project. It will bring you to this screen.
Then click on "Go to all New Custom Path". Below is the next page you'll see.
I'm doing this based on how I want our books to look but you can choose different options.
On this page I choose Hard Cover Books and then 12x12. It will then ask you to select photos for your photo book.
I skipped the cover and the first page, I'll finish these after the year is over.... since I'm not sure what pictures are the best to sum up our year.
Start on page 2 & 3 with a color back ground you want.
Under the layout tab click 5+ and select the layout that is 25 pictures and apply this to both pages. [done by dragging and dropping]
I allowed for one row on the left and two rows on the right for "stickers" [embellishments] and made the rest as a month layout, starting with Sunday.
I filled in each of my pictures one for each day of the month.
 |
| January in pictures |
Next I purchased the "sticker" 2013 for $.25 and added it to my project
I also selected another "sticker"
Added them both to the photo book. With the banner I wanted to rotate it 90 degrees, to do this just hover the mouse over the sticker until you see this blue rotate option.
I rotated it until it was the right angle and then resized the banner until it looked right on the side.
Next I added a text box and selected the options for the look I wanted.
And just like that the month of January is done! I added another sticker and it finishes out the look I wanted.
Repeat the same steps for each month. I recommend doing a month at a time. When you leave the picture holders blank they do not show up on the finished project.
This is how the month will look once its printed.
I've also completed February.
:)
This is not a sponsored post, no one at Shutterfly as asked me to do this, I chose Shutterfly because I like their photo book options.
Enjoy!


Thank you! I have been trying to figure out how to do mine, and this was super helpful!!
ReplyDelete